Make a Garden Pond
Step one: Find the Right Location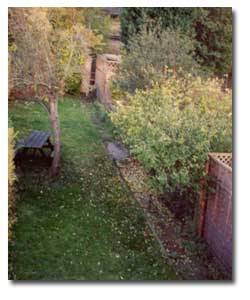
- The area should get plenty of sunlight.
- The area should have some shade during part of the day.
- Avoid the 'shaded' north side of hedges.
- Vegetation can overhang the area but avoid overhanging trees (too much leaf fall).
- For safety a pond at the rear of a garden can be fenced off.
This pond was dug out towards the rear of the garden beyond the tree. South is to the right in this picture so the area gets plenty of sunlight during the day and the afternoon with shade in the early morning. Too close to the house and the pond would only be sunlit in the late morning.
Step two: Digging out the Pond
- Create an irregular shape.
- Make sure the liner you have will cover the pond.
- Use (X + 2Z) by (Y + 2Z). X = maximum length, Y = maximum width, Z = maximum depth.
- Store the grass turfs to one side.
- The soil from the dig can be built up in suitable margins (the two corners by the hedge in this picture). This also saves on costs of getting rid of the soil dug from the pond area.
- With logs and stones this will make an ideal wildlife refuge/ 'rockery' next to the pond for emerging frogs and newts.
- Also put some of the soil onto a sheet of plastic.
- Have a deep centre over 50 cm and ideally close to a metre in depth (or more).

Create different slopes and depths
- Create various levels and slopes, from shallows to deep spots.
- Have steeper sides on the 'far' side (so children don't fall in).
- Shallow bays will be important for spawning frogs.
- Use pegs, string and a spirit level to get the right levels.
- Some of the soil from the dig can be used to raise up the banks.
- Also dig a trench for the liner to go into.
- To create a large pond consider hiring a mini excavator or 'digger' to do the work. Hire operators can also hire out digger drivers as well to operate the excavator.
Step three: Lining the Pond
- Modern pond liners are very flexible and strong and are recommended over cast plastic or fibreglass liners.
- But these may be an option for small ponds in small gardens.
- Initially put in the liner - with some soil to ’pull down’ the liner - to make sure the whole pond can be covered.
- If the base is on stony ground consider putting in sand and/or a protective lining under the waterproof liner, or carpet sections.
- Carefully pull open the liner, following the contours of the pond.

- There should be enough liner to go over the bank and into the ditch around the whole edge of the pond.
- Weigh down the liner in the ditch and the main pond, also using bricks/stones to hold it down, especially in deeper spots.
- There is the option to put a protective liner, or old carpet or sand on top. This provides extra protection but is not so crucil for a garden pond.
- Old carpet is a base for plants to grow. Avoid showing too much above the bank since it can suck up water out of the pond in hot conditions.
- Avoid carpets with a rubber underside.
- Carefully weigh down the liner with some soil and flatten out any creases.

Gradually fill up the pond
- Put in some water to settle the liner, and some soil (from pile on the sheeting) in the various hollows and banks.
- Then fill the pond. If you have a supply of rainwater in a tub you can use this. Tap water will be OK if the pond is filled in the winter. Or you may wish to let it fill naturally.
- Using tap water to fill a pond in the spring and sumer may result in an algal bloom.
- Once nearly full you may need to make some adjustments to the bank levels by adding or removing soil from the banks.
- Decide on the low point where water will drain in/out when full.
- You can also create more shallows and headlands with clay or sand.

Top up the pond
- Carpet sections can go in at this stage, weighed down with stones and bricks.
- Cut the excess liner aroud the margins.
- Do any final 'contouring' of the exposed liner.
- Push the edges of the exposed liner into the narrow 'ditch' that has been created around the margins.
- Put soil into the ditch to bury the liner around the edges.
- Put soil/clay on any exposed liner close/just above the surface.
- Put turfs around the pond margins.

Place turfs and 'hideways' around the margins
Step Four: Planting up and Landscaping the Pond
- Flat stones supported on bricks can create 'refuges' around the margins (rear of pond in picture above).
- The turfs around the edge came from the original lawn.
- Do not take plants from village ponds and nature reserves.
- Take plants from a friend’s local pond that needs some clearance.
- Avoid taking any plants from ponds that have 'alien aquatics'.
- This includes plants like the Water Fern, Parrot's Feather and New Zealand Stonecrop in the UK.
- You can also go to a good garden or water centre for natural plants .
- Or order online - your local wildlife trust can be a good initial contact.
- Choose a diverse range of plants.
- Submergents (underwater pond weeds), floating plants (e.g. water lilies) and emergents.
- Some species are combination of these.
- Also have bank-side plants.
- Plants like the Water Forget-me-not and Water Mint are very good egg laying plants for newts.
- Choose a range of plants that flower at different times of the spring and summer.
- The pale violet Cuckooflower and yellow Marsh Marigold flower early.
- Submergents can be put in onion sacks with soil and stones and thrown in so they sink to the bottom and take hold.
- Bricks with holes (filled with clay) are great for planting aquatic plants - these can be seen in the picture.
- Some plants that can spread quickly - such as the Yellow Iris - can be kept in pots (also in the above picture).
- Also inoculate your pond with some sediment from a pond to get bacteria, water daphnia and insects in your pond.
Step 5: Looking after your Pond

Pond with vegetation
- The wildlife 'refuges' can clearly be seen around the margins, flattish stones that have been balanced on bricks.
- Not only does it create refuges for widlife, but stepping stones to gain access around sensitive margins without trampling vegetation.
- A good wildlife pond with a range of plants, depths, and levels, and in the right location, will need less maintenance.
- The shallows may attract spawning frogs.
- The plants put in and around this pond included Purple Saxifrage, Yellow Flag Iris, Common Water-plantain, Cuckoo Flower, Marsh Marigold, White Water Lily, Water-forget-me-not, Watermint, Watercress, Spiked Water Milfoil and Rigid Hornwort.
- A lot of wildlife will come naturally to a pond.
- If you want a good wildlife pond, avoid fish. If you have to, stock it with a few fish, or have a fish pond and a wildlife pond.
- If a local contact has lots of spawn you can take a few clumps - more from a local pond that is being filled in (but do try to persuade them to keep the pond!).
- Avoid bringing spawn from further way - you may introduce a disease like ’red leg disease’ that affects frogs.
- Plants species like duckweed provide important shade and cover but can quickly dominate a pond and cover the surace, especially older ponds with a lot of silt.
- A good diverse pond should look after itself but blanket weed can take hold. Use a stick to carefully pull/drag it out of a pond.
- Carefully skim off duck weed and any other fast growing plants to keep some areas of the pond clear.
- Leave this ’weed’ on the side to let animals crawl back into the pond (also a good time to check the wildlife in your pond) before putting it on the compost heap.
Step 6: Enjoying your Pond
-
This picture was just two months after the pond was completed, with abundant aquatic life and lush margins.

Pond with Vegetation
- Clear/maintain a small viewing space.
- Avoid major pond work in the spring (it encourages algae to grow), just do basic maintenance (e.g. of blanketweed).
- Autumn is a good time when you can haul weed out of a pond and leave the weed by the side for a while for animals to get back into the pond.
- The pond can then settle down over the winter.
- Watch any activity (e.g. newts coming up to breathe).
- Net the pond carefully if you are catching pond life.
- Also look at the activity in your pond after dark with a torch.
- Look out for other wildlife that comes to your pond.
Safety With Young Children
- The deep part of this pond is on the far/inaccessible side.
- Shallower areas are by the accessible path and near end.
- If necessary a fence could be installed at the near end across the garden - or a ’grid’ put over the pond.
- Ponds provide plenty of enjoyment, education and wildlife encounters for children - like watching tadpoles grow!
Extra options
- Consider creating an extra shallow boggy area near the pond with any spare liner.
- As in the foreground of the picture below.
- Also create rock piles and log piles and addtional 'refuges'.
- For the pond in the following picture a big mound mixed with logs and rocks was created at the rear of the pond.

And this picture was taken in July just one year later:
